


Grilled Pizza
(By Hannah Dela Cruz, blogger and cookbook author)
Great pizza is all about the crust. It should be tender, spongy, crunchy, and most importantly, stand up to its toppings without being soggy. With such a thin piece of dough, pizza seems easy to do, but when baked at home it usually turns out chewy and hard.
To create the ideal crust, dough needs to cook quickly. The problem? Most home ovens only heat up to 500 F—not hot enough to bake dough without drying it out. Wood-fired or commercial ovens in your favorite pizza restaurant, on the other hand, can reach temperatures upwards of 850 F.
Luckily, most home cooks have a tool in their backyard that can do the job—the grill. Good-quality gas grills can heat up to a temperature of 700 F, and depending on the type of charcoal used, charcoal grills can heat up to a temperature of 1000 F. Grilling pizza gives it a crackly texture with a pleasantly smokey flavor that makes it the perfect summer treat.
Best Pizza Dough for Grilling
You can’t beat the taste of a sourdough pizza crust. It has a deep, nuanced flavor not achieved with commercial yeast. The long fermentation of sourdough will result in a crust with an incredibly airy texture. You’ll need a mature, active starter to make this recipe. Using a Brod & Taylor Folding Proofer will help you regulate the temperature during bulk fermentation, so you’ll end up with a perfectly proofed dough that bakes up into a crackly and tender crust every time!
Tips for Successful Pizza on the Grill
Although grilling pizza takes your pie to a different level, there are a few pitfalls you need to avoid in order to succeed. Because of the heat generated by your grill, the process will feel like it’s going really fast. And if you’re not careful, you’ll scorch your crust and end up with burnt pizza. But don’t worry, I’m here to walk you through the steps and give you tips for how to grill pizza perfectly every time.
1. Lower hydration dough
This grilled pizza dough recipe calls for much less water than conventional pizza crust. You’ll be handling and moving it a lot between shaping and transferring the dough to your grill. Using less water will allow it to maintain its structure without breaking apart.
2. Organization is everything
Preparation is key to a successful grilled pizza. Being methodical, intentional, and organized will go a long way in helping you throughout this process. You’ll need a table beside your grill so you have room to shape your pizzas and quickly transfer them to the grates. Crusts cook fast (about 2 minutes depending on the strength of your fire), so set yourself up for success by having all of your toppings prepared ahead of grilling.
3. Create a two-zone fire
Create a hot and cool zone on your grill. Use the hot side to sear and cook the pizza dough quickly, while the cool side will allow you to melt cheese and heat up your toppings without burning the bottom of your crust. On a gas grill, you can achieve this by setting the burners under one side on high and the others on low (or even off). If using a charcoal grill, place all the hot coals on one side.
4. Flip frequently
The fastest way to fail while making grilled pizza is by scorching it. Make sure your coals are not too close to the grate or it will burn your crust. Once you see bubbles forming on the surface of your dough, flip it immediately and then continue to flip it. Rotate the pizza with each flip for an even cook—about every 30 seconds—until the crust looks dry with no doughy spots. Be sure to wait until you see the bubbles forming on top of your dough before flipping or it will get stuck and tear (think pancakes).
5. Use your tools
A large wooden cutting board makes for a great surface for shaping your dough outdoors. In a pinch, you can use a 9x13-inch baking sheet. You’ll need to oil both so the dough doesn’t stick and easily peels off your work surface. A sturdy heat-proof spatula and tongs are the best tools for flipping your pizza and taking it off the grill.
6. Choose your toppings wisely
You’ll be finishing your pizza on the cooler side of your grill, which means the indirect heat won’t be strong enough to cook your toppings through. Use toppings like pepperoni, red onion, and peppers that don’t need to be cooked. Or, cook ingredients like mushrooms, chicken, and sausage ahead of time. You can also add your own dehydrated spices for added flavor!
Grilled Pizza Dough Recipe
Yield: 4 pizza, 1166 grams dough
Timing: Active - 1 hour 21 minutes; Inactive: 12 to 16 hours; Total: 13 to 18 hours

Ingredients
| Table header 0 | Grams | Ounces | Baker’s % |
|---|---|---|---|
| Active Starter | 100 | 3.5 | 15.38 |
| Water | 403 | 14 | 62 |
| All-purpose Flour | 650 | 23 | 100 |
| Salt | 13 | 0.45 | 2 |
Total Hydration: 65%
Equipment: Brod & Taylor Folding Proofer, mixing bowl, 9x13-inch baking sheet, pastry brush, rolling pin, plastic wrap, tongs, spatula.
Directions
Mix your dough: Combine your starter and water in a large mixing bowl. Using a wooden spoon or your hand, stir until the starter dissolves. Add the flour and salt into the starter mixture, mixing until all of the flour is hydrated and a cohesive dough forms. Place your dough into the Folding Proofer set at 78 F, with the water tray filled, and allow it to rest for 45 minutes.
Create strength in your dough: Turn your dough out onto a lightly floured surface. Knead the dough until it feels elastic and looks completely smooth, about 5 to 10 minutes. Return your dough to your Folding Proofer.
Bulk fermentation: Allow your dough to rise undisturbed until it has doubled in volume, looks bubbly, and feels like it’s full of air, about 4 to 6 hours depending on the strength of your sourdough starter.
Portion out pizza dough: Once your dough has risen, turn it out onto a lightly oiled work surface. Knock the air out of your dough and divide it into 4 equal portions, each about 292 grams (10.3 oz). Working with one portion at a time, cradle the dough in your hands and employ a tuck-and-rotate motion to stretch and create tension and form a tight skin.
Turn the dough over on your palm and pinch the seam closed. Place the ball of dough back on your work surface and drag it across to increase the tension and completely close the seam on the bottom. Place your shaped dough on an oiled baking sheet with the seam-side down. Repeat with each portion. Brush the tops of the dough with olive oil and cover with plastic wrap.
Cold proof: Place the dough in the refrigerator and allow it to rest overnight.
Prepare your grill and toppings: Remove the baking sheet from the refrigerator and allow it to rest at room temperature while you prepare your grill and your toppings.
Shape your pizza: Once your grill is ready, turn your dough out on a lightly oiled work surface (a large cutting board or a baking sheet works very well here). Lightly flatten your dough using your finger tips. Oil your rolling pin and roll your dough out into a long rectangle, about 6 by 11 inches. You’ll want these to be shaped like rectangles instead of circles so you can keep them on one side of the grill. Grilled pizzas should be rolled thin and evenly and do not normally have thicker edges. Brush the top of your dough with olive oil.
Grill crusts: Pick the short end of your dough up using your finger tips. The dough will stretch slightly so be careful not to tear it. Gently place your dough on the grates oiled-side down, and brush the top of your dough with more olive oil. Watch your dough closely. Once it begins to bubble, flip it immediately. Continue flipping your crust every 30 seconds, rotating it to give it even exposure to the heat. Remove your crust from the grill as soon as you no longer see wet doughy spots (about 2 minutes). Now, you can either remove the crust from your grill and continue cooking the remaining crusts or transfer your cooked crust to the cool side of your grill to apply the toppings.
Top your pizzas: Place the cooked crust on the cool side of your grill. Apply an even layer of cheese on your crust. Dollop sauce on top of the cheese, and arrange the rest of your toppings on the crust to finish your pizza. Close the grill, and cook for a minute and a half or until the cheese has melted and your toppings are heated through.
Enjoy: Allow your pizza to set for 2 minutes before slicing. Enjoy your pizzas hot!
Store and reheat: Wrap leftovers in aluminum foil for up to two days. Reheat under the broiler for 2 to 5 minutes.

Grilled Pizza Variations
Pepperoni with Hot Honey
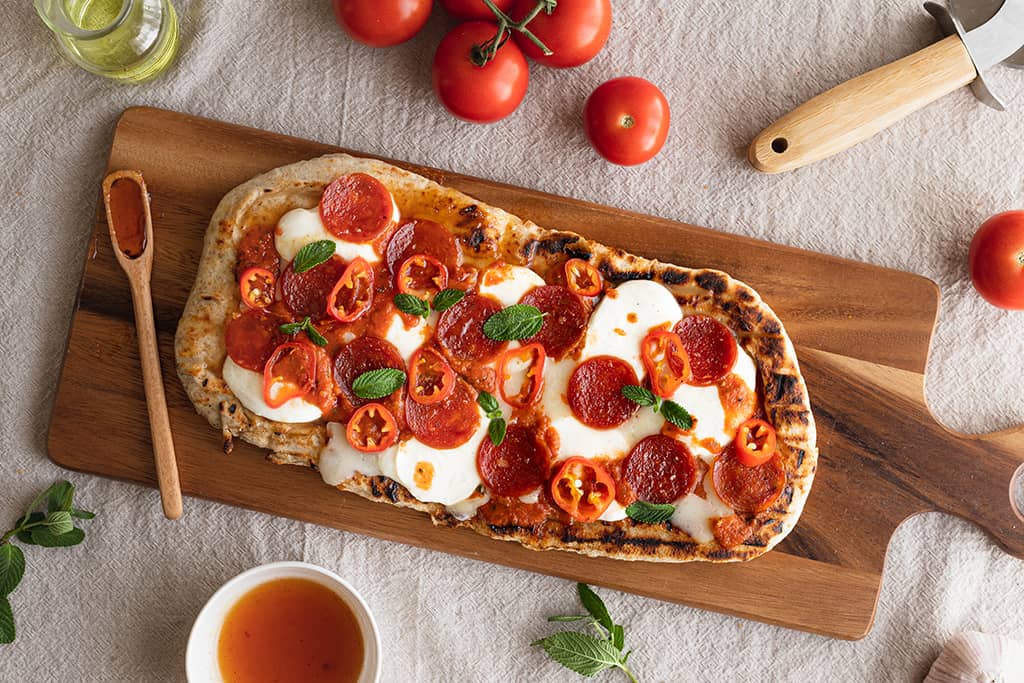
- Low moisture mozzarella
- Fresh mozzarella
- Tomato sauce
- Pepperoni
- Red jalapeno
- Fresh oregano
- Hot Honey (56 grams honey + 14 grams hot sauce)
BBQ Chicken Pizza

- Pepper jack cheese
- Fresh mozzarella
- Cooked chicken
- Diced poblano peppers
- Red onion
- Cilantro
- BBQ sauce
Elote Pizza

- Cotija cheese
- Grilled sweet corn
- Diced poblano peppers
- Mexican crema
- Taijin or chili powder
- Cilantro
Basil Plum Ricotta
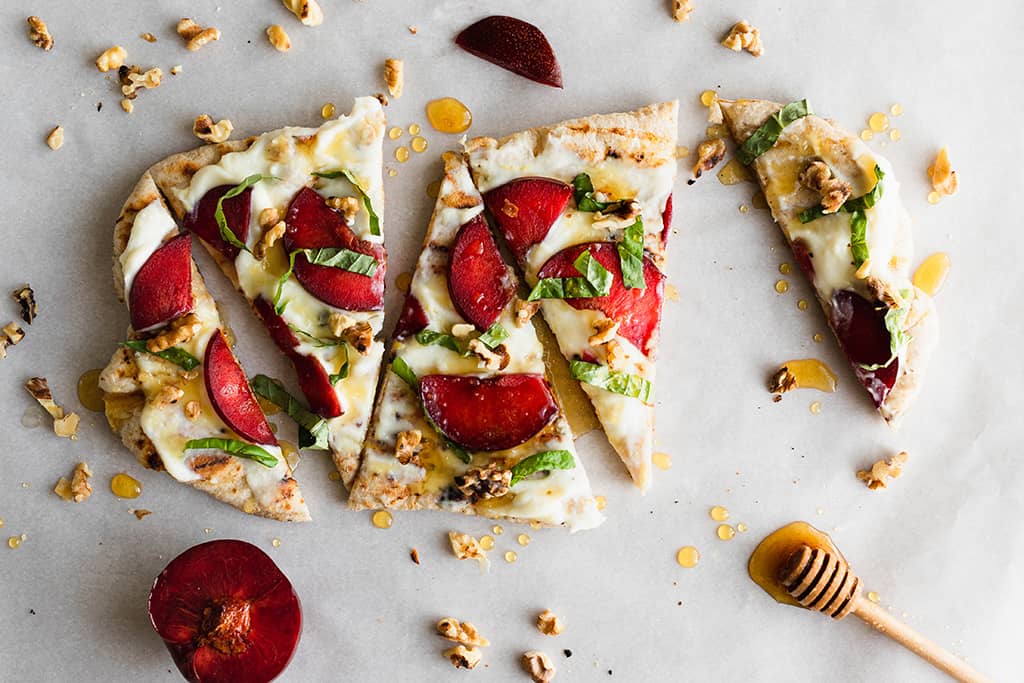
- Ricotta cheese
- Plum
- Walnuts
- Basil
- Honey


